

Saturday, June 30, 2012
Heart of My Heart Workshop
Are you coming to the AQS show in Grand Rapids in August? I hope to see you there! One of the workshops I'll be teaching uses my Give and Take Applique technique that plays with positive and negative design. It's a short 3 hour workshop that give you a great grounding in my technique and you'll be making my Heart of My Heart wall hanging, with lots of design variations to play with. Here's a sample of what might be your quilt!

Friday, June 29, 2012
Soy Wax Resist Workshop
I spent the last couple days teaching a Soy Wax Resist Workshop and we had a blast! We gathered at Studio G www.studiogart.com a lovely, purpose-built design studio in a wooded area in the Cowichan Valley.
The students and I explored several different techniques that can be used with soy wax:


The students and I explored several different techniques that can be used with soy wax:

Marny and Joan are preparing the indigo vat to use with pole wrapping and clamp dyeing.

Then they discussed Marny's work on her Cathedral Series, the results of her recent rip through France. Check that adventure out at www.marnymadethis.blogspot.com

Dale is painting a second layer of colour on her work.

Gillian is cutting a stencil from freezer paper to use with the wax.

Joan is howing a piece where she combined Decolorant Plus and soy wax, wonderful results from that one!

Some other pieces hanging in the sun after washing the wax out!

Here's the gang posing in front of a good days work! Thanks everyone!
Thursday, June 28, 2012
Quilting Designs Class
On Friday I'm teaching Quilting Design at http://www.quiltuniversity.com/ We'll be spending some time looking at design sources and how we can be inspired by design sources around us. By sources, I mean some of the many places where you might find inspiration for creating quilting designs.
- Look at corners of rooms, places where there might be some picture moldings, where there are joins of walls and floors.
- Look at the sidewalks downtown. Thank goodness city planners in many places are being more creative these days and we see interesting manhole covers, grating around trees and cement paths that have designs stamped into them.
- Try to see your environment in a slightly different perspective, while riding the bus or waiting in line for lunch. Look around and find curves of interest, straight or crossing lines. Think of repetition, pattern, sequence wherever it can happen.
- Pay particular attention to advertising in magazines and on billboards. It is all around us as we are too often aware. Ask your self how advertisers use design to get their message across? Think of the golden arches, car hood ornaments, the back pockets of your favourite jeans or the make up counter at the mall. Good design is fundamental to the object.
- Kid’s colouring books. Pick up a couple at the grocery store
- Post Cards. Who says you have to be on vacation to buy them?
- Sidewalks. Look down around you
- Your front door, the neighbour's front door
- Hub caps. They are neat, take a look
- Gift Wrap
- Birthday, seasonal and all purpose cards
Scrapbooking has become popular and there are hundreds of different ideas for quilting designs. If you do not scrapbook, you probably know someone who does. Ask them for ideas and resources. Consider using:
- different stamps (stamp a dark colour on paper and enlarge to the desired size)
- precut border templates for tracing
- die cuts for gluing on pages (simple little motifs to enlarge)
- stickers for motif ideas
See you in class!
Sunday, June 24, 2012
Rose Nouveau Quilt Pattern
Did you know that several of my quilt designs are available for download? I found my Rose Nouveau pattern that features my Give & Take Appliqué technique here:
http://www.mccallsquilting.com/content_downloads/Rose_Nouveau.pdf

http://www.mccallsquilting.com/content_downloads/Rose_Nouveau.pdf
Saturday, June 23, 2012
Shattered Angles Workshop
I spent the day with the Parksville Schoolhouse Quilt Guild and we worked on my Shattered Angles technique from my book: Accent on Angles. It was a wonderful day of play with colour and fabrics in a lovely workshop setting with lots of natural light and plenty of table space, hurrah!
Here are glimpses of the action:


Here are glimpses of the action:

Diane is playing with different ways to arrange her blocks.

Chris has her blocks laid out and ready to sew together.

Wilma is in the midst of cutting her strip units into blocks.

Fran is busy with her block arrangements.
Thanks to all the ladies for a super fun day and to Margaret for arranging and planning the weekend. Tomorrow is another great time as we work with photos on fabric.
I'm lucky to be staying at the Seameadows Farm Bed and Breakfast www.seameadowsfarm.com, a beautiful location with animals, gardens and an ocean view, what could be better!
Friday, June 22, 2012
Quilting Designs Class
Are you stuck when it comes time to quilt your masterpiece? Not sure how or what designs to choose from? There's so much to think about......
Join me for a three week workshop at www.quiltuniversity.com and learn how to choose the best designs for your quilts, how to adapt and change designs and stencils and how you can create wonderful themes for your designs.
The classes start next Friday, June 29th. Learn at home at www.quiltuniversity.com I hope to see you there!
Wednesday, June 20, 2012
Studio Reno is Done! almost....
I'm thrilled with my new studio and have enjoyed working in it the last few days! I learned:


I love my little fireplace, the remote control is on top, just a click of a button and I can have roaring flames without heat! Or heat without flames, it'll be nice and cozy in the winter as its my only source of heat in the room. I'll be putting a rod at the top of the brick wall to hang quilts.


My cutting table is my best purchase for the room. Its an Ikea kitchen island and was on sale for under $500. When we brought the boxes home I was very concerned that it would be too long at 72" but it fits very well and the storage is wonderful. My design wall is to the right and will measure 6ft wide x 5 ft tall. I lost a bit of height in the room because of the subfloor but I think it will work well.


The bookcases are set up, there's till some boxes to unpack, so I'll be buying some more book cases, which I had planned on doing anyway. I used the height of the bookcases to take advantage of the bulkhead on the ceiling.
So all in all, I'm pleased with the results, there's still some tweaking to be done, another trip to Ikea, pictures and design wall to hang. But I can now work in the space after almost two months of frustration! I'll continue to post as changes are made, stop by and see me sometime!
- renos take twice as long as expected
- little issues along the way cost the most!
- the decorating will take time
- many wonderful people made it all possible...thanks to Henry and Sean!
The floor space measures about 250 square feet, there's just one window but lots of wall space. I choose Navajho White (Benjamin Moore) for the walls and the brick and accent wall was Terra Red, why be shy?
I'll write another blog post about the flooring choices.
The lighting is all natural tube and I have a couple of other lights in work areas. We've maxed out the electrical possibilities so I'll need to be careful about the demands.
Here are the finished pictures, just need to do a bit of decorating!

I love my little fireplace, the remote control is on top, just a click of a button and I can have roaring flames without heat! Or heat without flames, it'll be nice and cozy in the winter as its my only source of heat in the room. I'll be putting a rod at the top of the brick wall to hang quilts.
Desk area is under the window, there will be a large bulletin board on the wall behind the chair and the desk will be replaces by a proper L shaped work area with filing drawers underneath. I'll be buying mats today to protect the floors under the chairs.
My cutting table is my best purchase for the room. Its an Ikea kitchen island and was on sale for under $500. When we brought the boxes home I was very concerned that it would be too long at 72" but it fits very well and the storage is wonderful. My design wall is to the right and will measure 6ft wide x 5 ft tall. I lost a bit of height in the room because of the subfloor but I think it will work well.
This is another Ikea kitchen island, but I've modified it for my pressing table with a padded surface. It has wheels at one end so its semi-portable.

The bookcases are set up, there's till some boxes to unpack, so I'll be buying some more book cases, which I had planned on doing anyway. I used the height of the bookcases to take advantage of the bulkhead on the ceiling.
So all in all, I'm pleased with the results, there's still some tweaking to be done, another trip to Ikea, pictures and design wall to hang. But I can now work in the space after almost two months of frustration! I'll continue to post as changes are made, stop by and see me sometime!
Tuesday, June 5, 2012
Take Four Fat Quarters!
I got home last Friday from teaching in PEI and Quilt Canada in Halifax (pictures coming soon!) One class that I taught was Take Four Fat Quarters, a fun approach to using just four fat quarters and playing around with a variety of options. there were place mats, wall hangings, table toppers and a tote bag.
One student, Barbara McCunn, finished her tote bag and just sent me a picture. the bag uses my Dragon Bones technique from my book Accent on Angles, available from www.fabricimagery.com
Barbara's niece had hand dyed the fat quarters for her, a great job by both of them!

One student, Barbara McCunn, finished her tote bag and just sent me a picture. the bag uses my Dragon Bones technique from my book Accent on Angles, available from www.fabricimagery.com
Barbara's niece had hand dyed the fat quarters for her, a great job by both of them!

Wednesday, May 16, 2012
Interview with Lois Hallock - Studio Designer Extraordinaire!
You may have been following the many trials and tribulation that I've been going through over the past few weeks as I endure a huge studio renovations. I'd like to say its all done and show you pictures.....but part of the sub floor is in and progress is being made, albeit rather slowly!

But I have spent a lot of time preparing for the reno, beginning almost a year ago when I first decided to move ahead. I had purchased Creating Your Perfect Quilting Space by Lois Hallock and spent a great deal of time going through all the chapters, gathering ideas, pouring through the internet and making many, many floor plans on gridded paper. I'll be continuing to walk you through the steps of my reno but I wanted you to meet Lois and hear what she has to say about how to create YOUR perfect quilting space:

Can you tell us a little bit about how you became interested in Studio Design, Planning and Organization?
I am one of those natural born organizers. I really enjoy figuring out the best way to arrange a room and the best way to organize stuff. It is like a big puzzle that has a best solution. I am an engineer and I have worked for over 20 years optimizing factory work by planning lean work flow, along with storing tools, plans, and supplies right where they are needed. These principles are universal and I found out that I saw things just a bit differently than other quilters as a result of these experiences. My book “Creating Your Perfect Quilting Space” was a combination of all my passions, organizing, quilting, and helping others.
What do you like best about your work?
I love helping people! It gives me great joy to hear from a quilter after she takes my class or attends my lecture, that I changed her life. Often the cathartic affect of improving her quilt studio, kicks off a highly productive and creative phase for the quilter. Sometimes these quilters go on to improve other rooms in their house. Others jump into a new activity, like teaching or hosting groups in their quilt study. One of my favorite stories was from Terry Martin, whose quilt studio is seen on the cover of my book. Terry shared with me that she felt isolated in her studio and that neither her teenage daughter nor her husband stayed very long when they dropped in. Well there were no comfortable chairs and the space was not welcoming to visitors. So we added a loveseat and TV, positioning Terry’s sewing table such that she could watch while she sewed. She said the first time she was watching old movies and sewing, her daughter stopped by and just sat down to watch with her. They chatted and laughed while enjoying an afternoon together. Terry said it was all worthwhile to spend quality time with her daughter.

How can I plan my studio before I start moving things around?
I highly recommend planning first before moving furniture. In my book I tell you to draw your studio to scale and cut out index card models of your furniture in order to try different layouts without moving furniture. Many quilters find my Quilt Studio Planner with scaled furniture models included and my half pica scale to be a great shortcut. I challenge quilters to create seven different viable layouts and take a photograph of each. Print the photos out and spend some time gazing at them and deciding which layout is the best (just like you would spend time deciding how to lay out your blocks on a quilt). Your husband or son will thank you for only have to move the real furniture once and being sure everything fits once it is moved!
What are quick things I can do right now to make my Studio work well?
1. Fold your fabric and store it on shelves where you can see it. I demonstrate fabric folding as a part of my lecture. Fabric is what inspires you to create quilts. You need to get that same feeling that you get when you walk into a fabric store when you walk into your own quilt studio. Fabric fuels your passion and energy, clutter saps it.
2. Sign up for my monthly newsletter at my website: http://www.clearview-designs.com/

What are the most common mistakes quilters make when planning their studios?
1. “Circle the wagons” – I heard this term when watching a HGTV show on home décor. It is used to describe positioning furniture against the outer walls of the room, leaving the floor at the center empty. It is as if the room was spun in a big centrifuge and the furniture was pushed to the outside. This is very inefficient use of space. The use of peninsulas and islands produce much better flow and efficiency.
2. Too much horizontal surface. Quilters think that the reason their horizontal surfaces are piled under is because they don’t have enough surfaces. Well the opposite is true. The more horizontal surfaces you have, the more you tend to pile things on them. Instead go vertical with storage. You will have a lot less clutter and be able to find things when you need them.
3. Furniture without storage. Quilters use ironing boards that take up floor space and provide no storage. Instead use a buffet or dresser with lots of drawers to hold your pressing surface.

4. Using poor ergonomics by having wrong height surfaces and office chairs not designed for sewing posture. In my book I tell you how to measure for good ergonomic heights. Be aware that office chairs do not come far enough forward to meet your back when you are in “sewing position”. I offer the Heavenly Sewing Chair at my website which is a fantastic chair for quilters. It is built custom for you with your choice of fabric. I had the pleasure of helping a consulting client who is also a medical doctor. She was blown away by the improvements she experienced when her ergonomic issues were resolved. She was amazed that with all her medical knowledge, it was simply choosing the right furniture that improved her quality of her sewing experience.
I hope you have enjoyed some of the ideas that Lois has presented to us, I know that I have followed many of her suggestions and found them to be so useful. I'll be addressing some of them over the next few blog posts and I hope you'll get some ideas as well.
PS. the photos above are not my studio!
Wednesday, May 9, 2012
Studio Renovations - Life Goes On!
I should have titled this post "Life Happens", last week I had to take a three day trip to Vancouver and the renovation slowed down, a lot. Now its ground to a complete halt.
The wall is completely down and has been insulated and dry walled, just waiting for the mudding and taping.....the guy said he'd be here on Monday, its now Wednesday. But "for sure" he'll be here on Friday, hhhmmmm?
The old carpeting came up and I went to Rona and picked out a mid range laminate for the floor. I really did want cork but it would have been well over $2500, too much for my budget.
But "life happens" again and we discovered that the concrete floor was too uneven to install the laminate overtop. So..... Sean, my son-in-law, who is doing an awesome jobe, is getting ready to install an entire plywood floor over the the concrete. But that has to wait for the mudding and taping...... did I mention that I wanted this all done in 16 days? NOT GOING TO HAPPEN!
Today, my beloved husband is doing the final sanding of the ceiling, after he removed the "popcorn" stuff from the 70's, yech! Don't ever put that stuff up!!!
Now we're off to Benjamin Moore with out $5.00 coupons for paint colours....but no painting til next week, I guess!

The old panelling is down and ready for insulation and drywall.

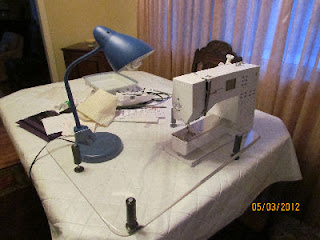
My sewing room is now the dinning room table!
Subscribe to:
Posts (Atom)