Saturday, December 5, 2020

New Times, New Studio

 When we moved to Pender Island, almost three years ago, losing my beautiful studio space and dedicated wet room (for dyeing and painting) wasn't too much of a hardship. We were going to be traveling a lot more and my philosophy was that I'd adjust my art to fit my space: small space = small work.....

And that worked for a while, we traveled, I walked two Caminos in Spain and Portugal, did an art residency in Iceland and we made lots of plans for the future....

Then the world went sideways and my art practise changed yet again! I took online classes and workshops, I went back to working large and I yearned for space to be messy and creative....

I started thinking about leaving home and I found a delightful space about 15 minutes away....so I packed up my studio and moved two weeks ago! Needless to say that I'm thrilled and I'd like to invite you in....


The studio is behind the circled window, Hope Bay is a lovely, picturesque seaside building that has a gallery, offices, a chocolate shop (yes!) another artist studio and sometimes a restaurant. 

Our neighbour Graeme helped us with his truck. I forgot to empty my thread drawers so heard the threads go ping, ping, ping onto the driveway!


I have cutting and painting space that measures 4' x 6' with lots of storage underneath.


There's a large counter that runs about 8' long. At the left end, I'm having a sink installed in a couple weeks, great for washing up and essential for my screen printing!
A few years ago when I built my studio in Victoria, I used a great book by Lois Hallock about organizing your studio space. Her premise was to think about a work triangle such as you'd have in your kitchen, only it was "sewing, cutting and pressing". That book has been very useful in planning out this studio as well. Map and measure and arrange on paper before moving it all in!


My sewing machine is right beside the window, absolutely tons of light - west facing and a nice view onto the courtyard and waterfront below.


The view from my window, the walkway goes down to the wharf, fishing boats and the daily mail boat...when times get better I hope the restaurant will open again. In the meantime the chocolate shop makes a delicious cappuccino!


My design wall is up and I'm working on another piece for my Industrial Shoreline series! I still need to put art on my walls and tweak some hanging space for papers but its all mine, I even have a little coffee corner with a kettle! I hope you'll stop by sometime....

Monday, September 14, 2020

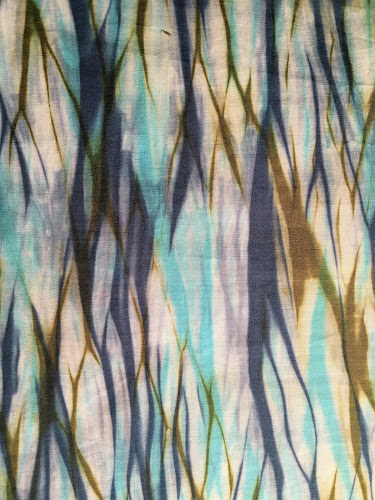
Shibori Shiraz

My outdoor dye place - I love my sink!

Yes, its been a while and I'm not even going to say why....

But I'm back at it and working at getting my creative mojo happening. This summer was spent dyeing amongst other tasks and I did a LOT of ice dyes, they are gorgeous! I'll do another post sometime and show you the best ones...but I also delved back into Shibori in a small way. 

Since moving to our small island my dye studio is outdoors and really just happens in the summer but last year I made some Shibori that worked very well as water on a quilt and I knew I needed more. So this is a little tutorial to show my version and it involves wine....

  1. Buy wine that has a uniform diameter bottle, no bulbous or fancy shape - buy the cheap stuff with a screw top and drink it all!
  2. Gather your wine bottles - fill them with water - and the same number of juice jugs, not one or two but at least three bottles and three jugs.

Measure the circumference of the bottle and add 1 1/2". Tear a strip, full width from selvedge to selvedge (no cutting, just tear) that measurement. Sew the fabric into a tube with a scant 1/2" seam allowance.


Pull the fabric tube onto the wine bottle, working from the neck down is generally easier. Place an elastic band at the bottom ( I like the thicker elastics from broccoli), push the tube down as far as you can and secure with another elastic at the bottom.


Mix up a soda solution in a bucket: 1/2 cup soda solution + 1 gallon of warm water, stir well. 

Place each bottle into a juice jug and pour the soda solution into the jug to the top of the fabric and let soak for 20 minutes.

Wearing a particle mask, mix 1 teaspoon of dye powder into 1/2 cup of water and stir well, some powder may float to the top so take a couple minutes to stir well.

I like to vary the intensity of the colour between each jug so I'll put a little bit, 2 tbsp. or so in the first jug, a bit more in the second and then finally the remainder in the last jug. Plunge each bottle gently up and down to get the dye mixed in the jug.


Let the bottles soak in the dye solutions for 2-3 hours then remove and rinse well.

Now comes the fun... there are endless colour and value combinations but I'll walk you through how I can get so much variety in a simple way:

  • make 2-3 batches of the dyed tubes, each a different colour - say red, green or blue
  • then take one red tube and two blue/green tubes (different values) and put them into a batch of yellow
  • from those three put them into a bronze or purple batch
  • there's no need to wash the tubes in between dye batches, just rinse, hang to dry and start again with a soda soak for 20 minutes and new dye colour in the solution
  • I repeat those steps over and over with different colour combination. Usually I only do three colours on one fabric, sometimes I'll stop at two if I really like them
  • one of my favourite is to dye with"indigo" from dharma Trading - it looks like the real thing but is a fibre reactive dye!
Once I have a batch of these tubes I unpick the stitching and I wash them all in the machine on a hot setting with a bit of Synthrapol detergent.
They really do glow beautifully once Ive ironed them ...


Wednesday, January 29, 2020

Textile Totes Tutorial....

Do you ever get an idea, a really great, awesome idea and have to just run with it? Right to the end to see where you'll end up? Maybe it comes in the middle of the night and all hope of sleep is lost? Or perhaps when you have another immediate, important deadline? And it stares you in the eyes and says DO IT! DO IT NOW!

Yup, it happened a couple weeks ago and I needed to try it out!!! I needed canvas - I live on an island - no canvas here! So a trip to the big city to the art store....several types of canvas - yikes! what to do? OK, buy some of each! Go home and test them all out. Primed canvas didn't work for my idea so paint the other types - the tight weave, more expensive canvas - not a success either. But the cheap, looser weave was perfect!

Did you know there's such a thing as clear gesso? Wow, I bought some and used it up quickly, had to buy more, damn that stuff is expensive! But it works equally well diluted with water! Who knew?

So I made a couple prototypes - playing with size and shape, which paints, brush strokes, markers and the like....love, love, love them! And of course, I lined them with some of my ice dyed fabrics....


Two years ago when we moved to our Island, I had to give up both my large studio and a separate "wet room" where I could get paint all over and not worry. Now I use the top of my washer and dryer which is quite ok, but not nearly as large.
Here's my progress pictures as I laid down a dark background and then picking up the vareity of colours in the lining fabric - did more painting and screen printing, layers drying in between.


I like the relaxed "slouchiness" of them but I could add a stiffener in if I chose. There's lots of alternatives to the design and if you visit the "black hole" of Pinterest you'll find tons of them!

I have three different sizes and you can see the variety that I've made in my Etsy Store:

https://www.etsy.com/ca/listing/756162464/textile-tote-hand-painted-and-hand-dyed?ref=shop_home_active_5&frs=1

https://www.etsy.com/ca/listing/770556385/textile-tote-hand-painted-and-hand-dyed?ref=shop_home_active_3&frs=1


https://www.etsy.com/ca/listing/770857855/textile-tote-hand-painted-and-hand-dyed?ref=shop_home_active_2&frs=1

And I'm offering free North America shipping on these fabulous totes!

If you are inspired as well, I found this tutorial that is similar to my process:

https://dearhandmadelife.com/diy-fabric-bucket/

And if you use Pinterest, just search for Fabric Basket Tutorial - if you disappear for a few days, we'll understand!