Showing posts with label sketchbooks. Show all posts

Friday, February 18, 2022

Week 10 - in the Studio

I was dragging my butt to get several totes and sketchbooks finished to send to my retailers - I need quite a few and it seemed like I was climbing up a long, tall mountain. But I got them all done and my, they do look nice! I'll be making more for my Etsy Shop and finally figured out how to dye a good range of colours for the linings....


I spent a few hours working on the publicity for Gathering the Threads Conference, an SDA-Vancouver Island/BC+Yukon event planned for the Cowichan Valley, June 15-18th, 2022. You can find more information here: https://gatheringthethreads.ecwid.com


We're still clearing out boxes of old photos and documents - I bought some decorative totes for each of our kids and they'll get everything from school records and their baby books - no more room in our house! 
And I discovered some luscious old vintage pages from a scrapbook, a soft velvety feel to them and I love how the edges are slightly browned. I've started making some marks on them, I have one page set aside as the "test" page to trial ideas...these are so precious! BUT, I am determined to use them, not saving them for some unknown day in the future...that will probably never come!


My "test" piece with white acrylic paint and indigo acrylic ink


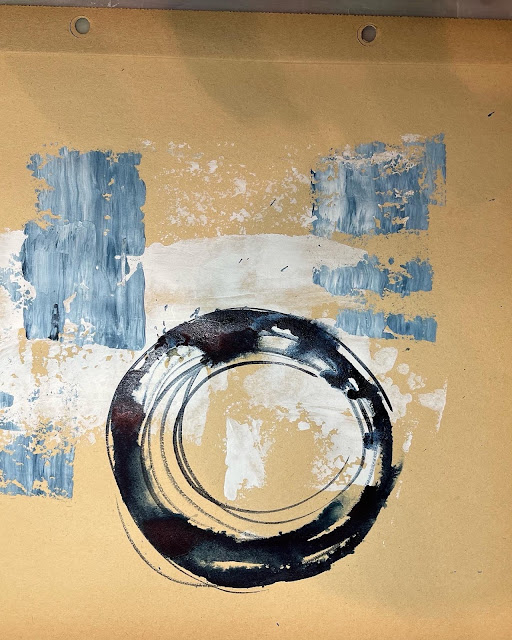
I love the rich yellows in the paper...


I mixed the paint and ink together - love the blues


Still lots to do on each page but I'm working carefully and slowly, planning each step....an unusual process for me. I often rush through and then the results are haphazard. This time I will go forward with more planning and purpose....I wonder if it will work?

And I had a studio visitor this week, she didn't hang around very long!


Tuesday, February 8, 2022

Week 8 1/2 in the Studio

 Well, those days just whizzed right on by! A couple trips into the city took up the better part of a couple days....even if its just there and back, it still takes several hours. 

But I was able to spend a good chunk of time in the studio and was so pleased to finish up the top of my latest Industrial Shoreline piece. It's smaller than some of my more recent ones and went together in a well behaved fashion! There's still lots of work but I need to get into the city(again) to get the batting, though Ive just finished dyeing the backing. Once its sandwiched then I'll add more details with stitch and couched lines.

Here it is and the photo that inspired it, taken at Port McNeill, in the northern part of Vancouver Island:


I spent a day filming a new segment for my Cloth to Codex Workshop, the lesson was focused on "vessels and structures" such a difference working in 3D! I made several different prototypes, trying different shapes and cuts to see how units might fit together. My plan is to develop another workshop that focuses on just this topic, there's so many possibilities to explore! But the number #1 rule it to always create a prototype to see how it can work (ask me about all the paper failures on the floor!)


I'm also working on a group of bowls/plates/vessels to submit to a local exhibition. The theme is Food and I'm creating three that will be Breakfast/Lunch/Dinner with collage, painted papers and text.
First one is Breakfast and will be bright and sunny with eggs scattered over the surface....here are the first steps...

Painted tissue paper, cut out and ready...


The circles are glued to painted watercolour paper...

I've also made a stack of sketchbooks, ready for my Etsy Shop and local vendors....


So that was fun!


Friday, October 25, 2013

Exciting New Workshops

I've spent a few days writing and designing some new workshops and updating my most popular ones. I'm so excited about the choices I can offer my students! You can check them out here:
Or here's a run down of the latest ones:


Design Explorations


 Using basic design principles in piecing, applied layers and stitch, students learn to create dynamic and exciting designs for their quilts and develop their own visual voice for future explorations. Students begin by using their chosen ideas and themes and with a variety of small format exercises each day, working towards developing and creating resolved pieces. Students will be encouraged to set personal goals and use a journal/sketchbook for visual record keeping.


Creative Sketchbook


A blank piece of paper can be daunting but a sketchbook of colour, design and texture is so rewarding! Release your inner artist with simple, easy exercises to get the creative juices flowing. You will play with paint, paper, glue stick, crayons, markers and more and get ideas and inspirations for quilt design, new projects and unique ways to see, document and inspire. 


Mrs Matisse Does Applique


What if Henri’s wife had great fabric and fusible web to play with? Design a unique mosaic-style foundation with painted and dyed fabrics then cut out shapes for a still life or floral arrangement. Additional interest can be added with paintsticks, markers and coloured pencils. Explore the many design options possible with fused collage. Stitch and thread choices will be discussed.

Thursday, August 29, 2013

From My Sketchbook - Stamps from Photos


The picture below was taken when I visited Chicago in April and went on a Design Tour. This is a very simple design which reminded me  of a few of the Stained Glass designs I have done for quilt patterns. I’ve printed it out and done some alternate sketches of it which you can see below left.


If you are not sure where to start on your Design Journey, begin with something simple. Look at designs around your house, a piece of china, the pattern on a chair or table. Trace it out and repeat the image two or three times and see where it might lead you. There are no rules and you don’t have to share with anyone until you feel ready.

 
Make a couple of copies of the photo you have taken or do a rough sketch.  

Carve a stamp from Speedy-Cut with lino cutting tools.
 
Use paint or stamp pads to create layers of colour and play with different ways to arrange the images. Try different colours or multiple colours, turn or rotate the stamp for different effects.


Monday, August 26, 2013

From My Sketchbook - Continuous Line Drawings


Continuous line drawings are one way of improving your drawing skills by observation. You may do many drawings before you produce anything you actually like. As with other art exercises, you are not ‘making pictures’ so much as being part of the process. Don’t be stuck on the idea that you are ‘making art’ and must produce something worthy every time you put pen to paper.
You can make these drawings almost anywhere, at a café, playground, shopping mall or sitting in your home. Have a large pad of paper and use either a pencil or marker/pen. Sit comfortably and look at the subject, start on one side and work to the other without lifting your pencil or pen. You can look at your work if you wish, but its often helpful to keep your gaze upon the subject and not trying to ‘improve’ your work while creating it.


Try this on a daily basis and see what gradually develops as you work. Consider drawing the same subject from different angles every day for a week.
Check out this website: 


Thursday, January 3, 2013

Sketchy Thursday

I love the start of the new year, new beginnings, new ideas, new inspirations! I decided that I would try to post on my blog on a more regular basis and try for a few different themes to keep it interesting. So for each Thursday I plan on posting something from my sketch books.
I've maintained sketchbooks for a few years, I think the habit came from the variety of workshops I took with Gail Harker, first a series of City and Guilds classes and then some of Gail's own series. Check out her offerings at www.gailcreativestudies.com I sure can't recommend them highly enough and now she offers them online-a real bonus if you don't live in the Pacific Northwest!

Gail introduces her students to one of the best quality sketchbooks that are produced. They come in a variety of sizes and I love the 9" x 9", but also the 8" x 10" and the 6" x 6", the 6" x 9" and probably every size there is! The line of sketchbooks is called the AquaBee and they are perfect for mixed media, wet and dry applications and are a Natural White paper. I use a variety of marking products, this time I'm using felt tip markers. Just a note on markers----don't use Sharpie, they tend to leave a hard dot at the beginning and end of a line and they often smear when wet. I much prefer Faber Castell Pitt Artist Pens, Pigma markers or Pentel markers. Actually my favourite is the Pitt marker as it has India ink which is perfect for using in my Thermofax machine!


If you are nervous about putting a line on a BIG WHITE PAPER, many people find it to be helpful to mark the paper first in some way. I love to paint my pages first. You can use any colours or media you want, such as acrylic paints (great way to use up bits and pieces of colour) Procion dye washes, watercolours or gouache. Try a variety and play with colour combinations. You can't make mistakes! I used complementary colours of yellow and mauve on the pages below and added some iridescent wash as well.


Next I chose to use circles as a theme for one page, how many ways could I draw lines through those circles or divide them up into other shapes? Here's just a little sampling of limitless possibilities:


On the second page, I following the colour changes and made contour lines to emphasize the borders between the different colours, I also played around with some silver pen to highlight some areas. There's so much more that I could add to these pages, let's try some other ideas out for next week!
 
What do you like to try in your sketchbooks?


Tuesday, February 21, 2012

More about Sketchbooks


Size is important to think about if you work in a variety of styles, media and locations. I like the large 16" x 20" for working in the studio. I can paint the papers, move pages from book to book and more. for that size I like the coil bound ones, and Aqua Bee are my favourite with rich, firm 93 lb. paper.
Check these out here: http://www.beepaper.com/paper/classic-super-deluxe.asp

But I also like a 6" x 9" or so for carrying around from place to place....very portable and the pages are large enough to get lots down. For that size then a hard cover is important to take lots of punishment. I prefer a bound book with a heavy weight paper so it can take water media as I tend to use my watercolour pencils a lot with that size.
These are yummy! http://www.dickblick.com/products/hand-book-artist-journals/

Then there's the little ones, perfect for fitting into my purse, pulling out in restuarants or on the bus, easy to take notes or make a quick little sketch....and I love the Moleskine three pack that are about 4" x 6", some have a pocket at the back for keeping love letters and more.... paper quality isnt as important as I'm using mostly pen and markers, but Moleskine does have good quality paper in their books.
Here's some to tempt you: http://www.moleskine.com/catalogue/classic/cahier/