Showing posts with label thickened dyes. Show all posts

Tuesday, January 22, 2019

Colour Blocking Online Workshop

I'm gradually moving my wide selection of online workshops to an "on demand" setting. Why? I'm finding that students want to access workshops when they see them, rather than waiting for a set date. Plus, I'm on the road a bit more these days and find a different selling platform to be helpful.

So, I've just finished setting up Colour Blocking within my Etsy Shop, meaning that you can get immediate access to the workshop as a downloadable lesson.
In Colour Blocking you will get a thorough PDF with hints, tips and dye recipes and a separate supply list with sources for buying dyes and chemicals.
There's a 40 minute video that you can watch at your convenience, plus you can download and keep the video for as long as you like...my workshops NEVER close!


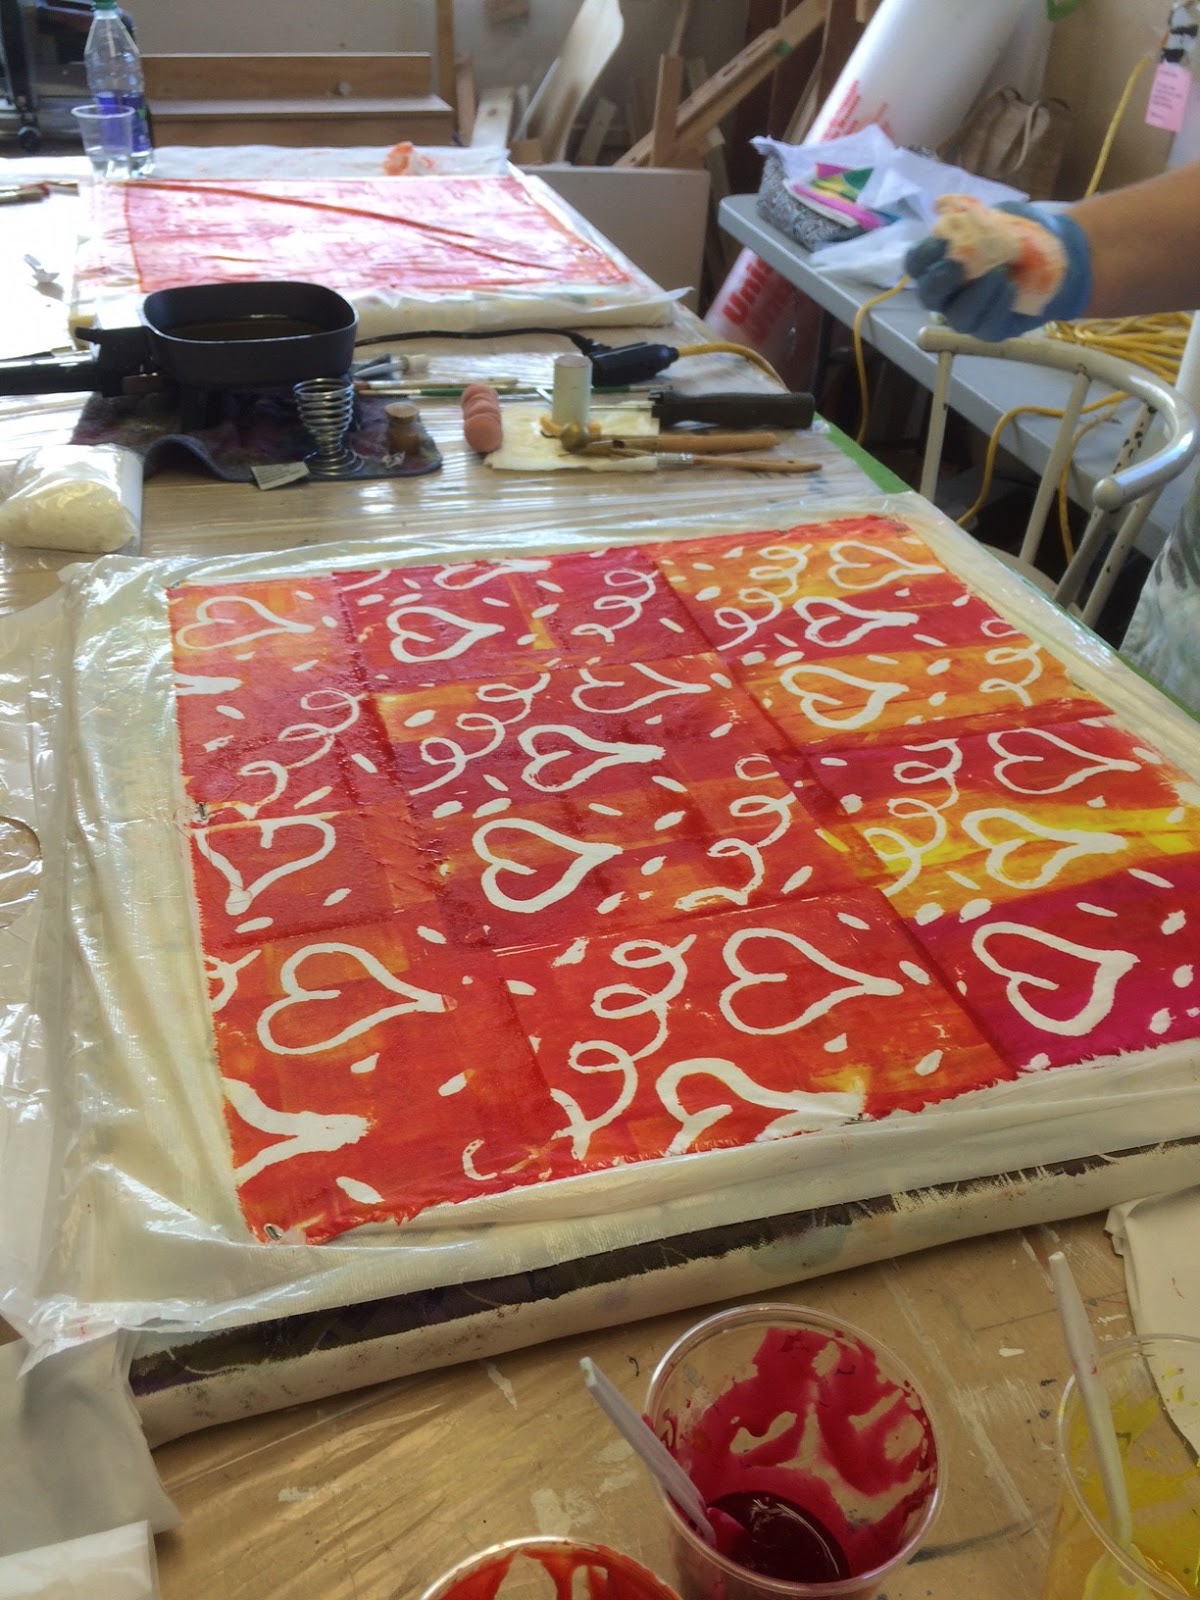
You might be wondering what Colour Blocking is....? It's a term I use to describe the process of screen printing with thickened dyes rather than the more common textile paints.


Why thickened dyes....these dyes do not change the hand of the fabric, allowing the fabric to remain soft and supple despite repeated applications, plus thickened dyes are transparent, so layers of dye will change intensity, value and colours, giving you a wide range of possible uses for their created cloth.
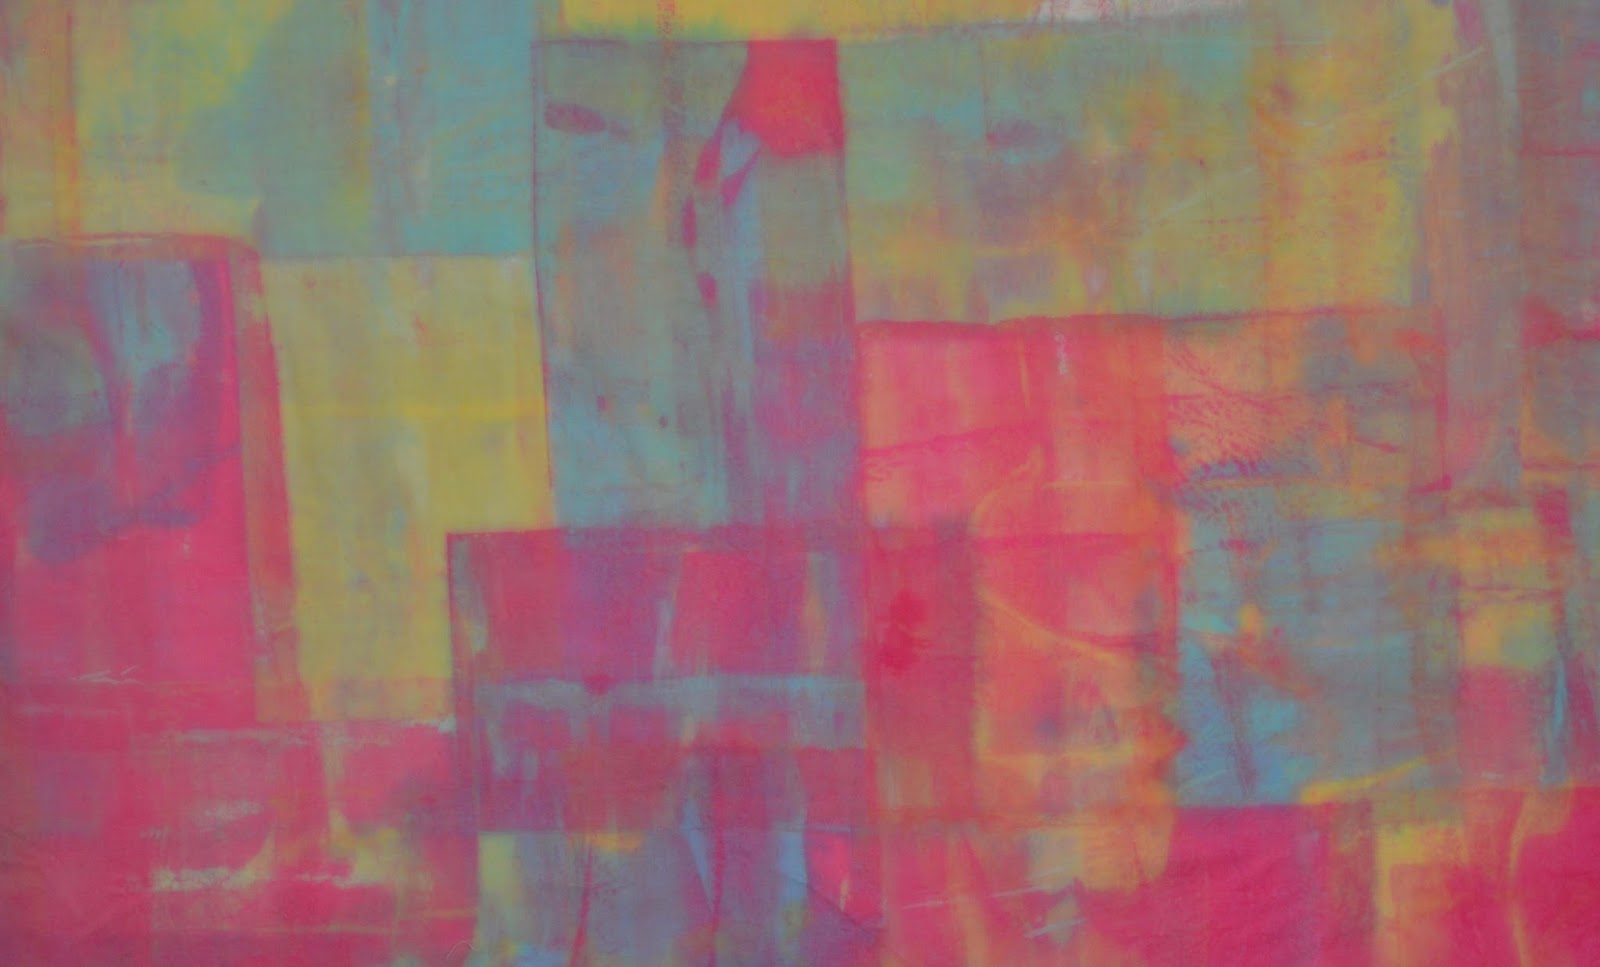
The colours can mix within the screen during applications and you can also paint over the screened images so additional colours and values can be achieved.
It's also possible to mask out areas of the screen (I use soy wax) and create amazing secondary or layered imagery.
Circles painted on screen with soy wax
You can also layer fabrics, sheer organza on top and cotton or linen underneath and get fabulous depth of colours. Or mask out sections of the fabric with freezer paper.....


In the workshop you are welcome to ask questions and I'm only a mouse-click away!
 
Masking with soy wax plus mixing colours in the screen
All of this  - plus enter the code: BLOGPROMO for 10% off the workshop....

Here's the link, I hope to see you in the workshop: https://www.etsy.com/ca/listing/676048561/colour-blocking-online-workshop-printing?ref=shop_home_feat_4

Saturday, August 13, 2016

Screen, Print and Stitch - Online Workshop is Open!

Screen, Print and Stitch

Are you looking to build your skills as a surface design artist? Do you want to learn specific techniques that will help you to create beautiful fabrics for your art? Perhaps you are new to the world of mono printing, thickened dyes, screen printing and stamping and would like a solid foundation of knowledge that you can refer to again and again?


Then “Screen, Print and Stitch” is made just for you! In the past, these lessons have been separate workshops, but since so many of my students enroll in more than one of my surface design workshops it made sense to build a special group package with tons of value-added information. So now “Screen, Print and Stitch” is a more extensive journey into helping you build those skills that you’ve been wanting for your textile art!

Early Bird Registration
Sign up NOW for only $120.00


In this nine session workshop you will learn:
• to make your own “homemade” gelatin plate. You will use stencils, doilies, kitchen tools and more with textile paints and explore all the possible ways to get colour onto cloth.
• to make your own hand carved stamps as well as using found objects for more layers of colour.
• different ways of creating roller prints with cardboard tubes, texture and sponge rollers for amazing effects, take out the rolling pins!
• to make simple, basic silk screens that will meet all your needs and the appropriate paints and tools to use.
• to use freezer paper stencils and other masks, then move on to using soy wax on the screens with thickened dyes.
• other screen printing techniques will be demonstrated including Thermofax screens, using gel mediums for foil and special effects and how regular “blue gel glue” can be used as a resist!
• creative ways you can make pattern and colour on fabric using resist techniques such as PVC pipe and other tubes with painted and immersion dye baths
• and one lesson will be focused on the exciting results that can be achieved with stitched resists


Does this sound like a lot? Remember each lesson is paced so that you can learn at your own speed, you can download the video to watch anytime and to keep forever! With “Print, Screen and Stitch” you will get:
• all nine videos with over 5 hours of information packed value
• two Thermofax screens mailed directly to you with a creative design for printing
• a bonus lesson on compiling your creations into a unique and special fabric journal
Plus:
• pages of written notes with all the dye recipes, resources, tips and hints that you’ll find so valuable for future reference!
• you have the option to join a private Facebook group that’s just for you to post pictures, see others inspiring fabrics and much more. It’s the best and most immediate way to get together!


Sign Up Now and get a Bonus!

A Private One-on-One Surface Design Mentoring Session – just for you!

30 minutes of conversation, advice and more….that will move you along your Surface Design journey! I’ll work with you to decide the best way to spend those 30 minutes together….it might be Skype, email, phone or ??


I’ve been a dyer and surface design artist for over 15 years. I’ve taken loads of workshops, I have advanced diplomas in textiles and art. Name a technique, I’ve tried it. Sometimes it takes lots of skill and practice to achieve success. And I get that….its part of being an artist!
Now, I want the same for you! I don’t keep anything back, I’m willing to share everything I know and I want you to have the value of what I’ve learned.


All of this is just for you because I know that colour and beauty is what we crave and having it on fabric just makes life so much better, right?
Be part of the fun and learn all about the new ways to create those gorgeous fabrics!

Learn More and Register HERE


Tuesday, July 26, 2016

Colour Blocking - Registration is Open!

Do you love dyeing fabric? Are you looking for a new way of creating luscious colour that changes across the surface, almost by magic? Curious about screen printing?
Then sign up for my Colour Blocking Online Workshop that begins on August 4th. In this workshop you will learn all the necessary steps to make amazing fabrics that will inspire you to create wonderful art.


In this workshop you will have a 45 minute video lesson (that you can download and watch forever), a printable PDF with all dye recipes and step by step instructions. In addition you'll be able to leave questions and comments on the password protected webpage. There is a private Facebook group to join, if you wish where other students share photos of their work and talk about their Colour Blocking projects.
 So what is Colour Blocking? Its a way to use thickened dyes as a base for printing with a silk screen. Thickened dyes do not change the hand of the fabric, allowing the fabric to remain soft and supple despite repeated applications, plus thickened dyes are transparent, so layers of dye will change intensity, value and colours, giving the artist a wide range of possible uses for their created cloth.

  I’ve been using thickened dyes for several years and love to screen print with them in a technique I call “colour blocking”. By using an open screen, with no images masked on the screen, I can achieve large areas of one or several colors that can mix and combine on the fabric.

 Students sometimes ask about fabrics....they wonderful part about Colour Blocking is its versatility1 You can use any fabric that works with Fibre Reactive dyes, so think of cotton, linen, hemp and silk. In fact any natural cellulose based fabric is perfect! Can't decide? Then why not layer some fabrics on top of one another! There's so many great effects that you can create with this technique, its not surprising its one of my favourites!

 Are you thinking this is for you? After you register for the workshop, then check out my free video on making a print table, you'll need one for the workshop. You can get the video here:


Can't wait to get started? If you are a Quilting Arts magazine subscriber, then my article about Colour Blocking appears in the October/November 2014 issue!

I'd love to have you in my workshop, so sign up now and be one of the first to learn Colour Blocking!
You can get the supply list when you register and be ready!


Friday, May 22, 2015

Colour Blocking Workshop

I took a break from my series project to teach this morning and thought you might be interested in seeing some of what my students had created.
The workshop, which I call Colour Blocking, is working with thickened dyes through an open silk screen. This allows you to mix colours right onto the screen and create wonderfully rich combinations of values and open or closed areas. The fabric that is made is perfect for piecing, for applique or the addition of other surface design techniques.

 Here you can see the blue and green laid down onto the fabric and mixing as the scraper is pulled across the surface of the screen. By rotating the screen horizontal or vertical designs will appear.

 Sarah is so excited her hands are a blur! She likes the blue and magenta colour scheme.

 Joan has the complementary colours to her shirt and has almost finished her piece of fabric.

Its possible to mask off areas of the fabric with freezer paper cutouts or to put soy wax on the screen to act as a type of mask. Many possibilities....
Are you interested in learning more? My online class will begin June 25th and registration will begin June 11th. Further information can be found: www.susanpm.com/online-workshops

Thursday, October 23, 2014

Colour Blocking - Quilting Arts Magazine

If you are a subscriber to Quilting Arts magazine, then you've seen my article titled  
Colour Blocking - with Thickened Dyes! It's a very versatile technique that I'm super excited about!


One of the many advantages of using fiber reactive dyes is their versatility, they can be used in dye baths, flat dyeing,  and when thickened, can be used as a paint. Thickened dyes are suitable for screen printing, stamping, working with stencils and freeform applications. 

Their advantage over acrylic paint is twofold, they do not change the hand of the fabric, allowing the fabric to remain soft and supple despite repeated applications, plus thickened dyes are transparent, so layers of dye will change intensity, value and colours, giving the artist a wide range of possible uses for their created cloth.

 These fabrics, silk organza and cotton are layered together, then printed with thickened dyes.

 Great effects are achieved when you use many colours for printing!


Intrigued? Then pick up a copy of the latest Quilting Arts magazine, or learn at one of my Studio Workshops I'm teaching in early 2015. You can read further details here: 
I hope to see you there!

Thursday, February 13, 2014

Colour Blocking with Thickened Dyes

One of the lessons in my Screen Print with Success workshop involves using thickened dyes to print across the surface of the fabric. I love doing this exercise as its a fabulous way to play with colour mixing.
Here are some of my results:


Its not too late to register: http://susanpm.com/online-workshops/

Monday, January 20, 2014

Screen Print with Success!

Screen Print with Success is open for registration! Join in this fun class and learn several ways to create image, texture and colour on fabric. These techniques show that screen printing is not difficult or expensive.Students will learn to make simple, basic screens that will meet all their needs and the appropriate paints and tools to use.

We will begin with freezer paper stencils and other masks, then move on to using soy wax on the screens with thickened dyes. Fabric dyes provide wonderful transparency, allowing you to build layers of colours without changing the hand of the fabric. Other screen printing techniques will be demonstrated including Thermofax screens, using gel mediums for foil and special effects.

Time will be spent on showing how the printed fabrics can be used in quilts, clothing and mixed media. Workshop fee will include one small Thermofax screen of student’s choice, mailed at the beginning of the workshop.

Does this sound like a fit for you? Well, hurry on over to: http://susanpm.com/online-workshops/ and sign up, registration is limited so don't delay! We'll see you in class!

Saturday, May 18, 2013

Lessons My Quilts Have Taught Me


It's a good feeling to finish a quilt! I often tell my students that every project and every quilt teaches us something. It can be a lesson about colour, design, piecing or an unexpected surprise.
A couple weeks ago I finished Wild Thing. 
 This quilt started out as plain white fabric, I used a combination of PFD cotton and Essex Cloth,  cotton and linen blend. I used thickened dye to paint circles onto the cloth, then batched and washed it. The next step was to apply soy wax to areas where  I wanted to preserve the colours and then painted a variety of colours of medium/pale strength dyes.
After washing and ironing, I cut the fabric into squares and then cut the squares in half and reassembled the rectangles on my design wall. The piecing and sandwiching was straightforward.
 I chose to quilt with a variety of weights of thread from a heavy 12 cotton down to light 60 rayon. I ordered another 12 spools above the 20 I had chosen from my collection because I wanted to follow the colour changes across the surface, matching the thread colour to the cloth. Therein lies the lesson!  
 When you create colours on cloth, then add more colours to blend and mix and create more, there are endless variations in values, tints and tones. When I look closely at a particular place on the quilt and start to think about the colours I see it can be challenging to narrow my choice of thread colour.
When I look at a blue, I need to decide if it leans towards a red-blue, a green-blue, does it have a tinge of orange or purple? How and where does it change on the surface? that can determine my thread choices and how often I have to change the spools.
I began by quilting the areas where it was simpler to choose the thread colours, dropping the feed dogs and using a top stitch needle. I followed the lines where the colours changed and worked across the entire quilt. Once the easier areas were quilted, I moved onto more challenging colour areas, sometimes a variegated thread would be useful but I often found the changes occurred where I didn't want them. It was often better to switch the thread to another, closer colour.  
 I am very pleased with the results, I learned so much about colour, how colours can be changed, looking closer at the base hues of what makes any particular colour. Maybe I also learned that one can never have too many threads.... I may have to go shopping!
What lessons have your quilts taught you?

Monday, March 19, 2012

More Design Excitment

The second day of our class at Quilters Dream focused on using thicked dyes and monoprinting with a variety of tools including carved rollers, texture plates and pencils. Students worked hard and had fabulous results:


Shirley uses thickened dyes with texture plates and a brayer.


Sharon is colouring with Inktense pencils to fill in areas of her design.


Lynnette has great success with carved rollers to create repeating layers of design with two colours of thickened dyes.


Kathy has used a different carved roller to lay design on her fabric.